DIY Dog Agility Equipment: Easy Homemade Setup Guide
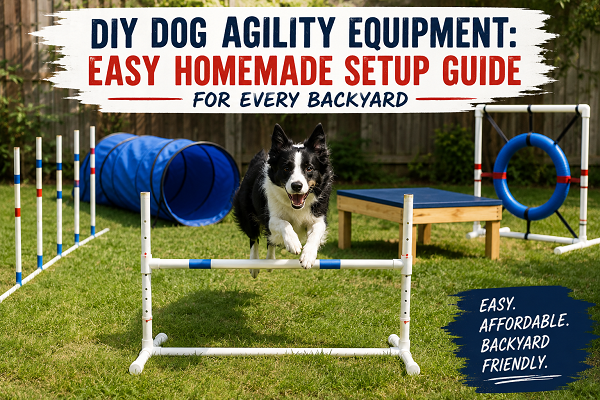
You can build DIY dog agility equipment from PVC pipe, a few fittings and some scrap wood. Start with low jumps with a bar that falls off when hit, a set of weave poles spaced 24 inches (60 cm) apart, a tunnel and a non-slip pause table. Skip homemade A-frames, dog walks and seesaws. Those carry real fall risks, so buy them or use a club’s.
Table of Contents
- Introduction: Why Build Your Own Course
- What I Changed After Reviewing the Top Guides
- Safety Rules Before You Cut Any Pipe
- Tools and Materials
- Step-by-Step Builds (Jump, Weave Poles, Tunnel, Pause Table, Tire, Low Plank)
- Jump Height Chart (Measure Your Dog First)
- Backyard Course Layouts (Big Yard and Small Space)
- 4-Week Training Plan
- Troubleshooting: When Your Dog Won’t Play Along
- Weather, Surfaces and Maintenance
- Cost: DIY vs Store-Bought
- Breed and Age Guide
- FAQs
- Conclusion and Next Steps
Introduction: Why Build Your Own Course
Priced a full agility set lately? A starter kit from a specialty shop can cost several hundred dollars, and that’s before you know whether your dog loves the game. So most people either skip agility or set up something wobbly and unsafe.
Here’s the good news. You don’t need fancy gear. In my years of handling working dogs, I’ve seen dogs light up over a pole balanced on two buckets. What dogs need is a safe surface, a clear job and a handler who rewards the right behavior.
This guide shows you how to build a homemade dog agility course the safe way. You’ll get exact cut lists, jump heights based on AKC divisions, a realistic training timeline and a fix-it table for the problems that stall most beginners. It works for family pets, sport dogs and working breeds like Malinois and German Shepherds, and it uses standards from the American Kennel Club (AKC) that you can compare against rules in the UK, Europe and elsewhere.
Why do handlers like me use agility at all? Obstacle work builds body awareness, confidence and focus. Many police and military K9 programs use obstacle courses for the same reasons, and I led an agility demonstration with a military working dog at the Nigerian Army Day Celebration (NADCEL) 2026. A backyard version gives your dog a taste of that work.
What I Changed After Reviewing the Top Guides
I read through what ranks for this topic. Most pages are either a list of links to other people’s plans, or a general “use PVC and have fun” article. A few gaps stood out, so I filled them:
- Real build details. Many guides say “make a jump” without a cut list. Below, you get measurements, in inches and centimeters.
- Honest advice on the tunnel. One experienced agility instructor points out that homemade tunnels rarely last, and that a cheap bought tunnel is often the smarter pick. I agree, and I’ll show you both options.
- A safer path to contact work. Instead of telling you to build a dog walk or A-frame, I show a low plank exercise that teaches balance and confidence with almost no fall risk.
- Small-space and rainy-day options. Not everyone has a big lawn.
- Troubleshooting. Most guides stop at the build. The hard part starts when the dog refuses the tunnel or knocks every bar.
- Inspection and maintenance. Gear fails slowly. A short routine prevents injuries.
New to the sport? Read our beginner’s guide to dog agility training first or alongside this one.
Safety Rules Before You Cut Any Pipe
Agility is a real athletic sport. Treat it like one.
The 8 non-negotiables
- Breakaway bars only. The jump bar must rest loosely so it falls if a paw clips it. Never glue, zip-tie or wedge it.
- No hard jumping while still growing. Growth plates close between roughly 10 and 18 months, later in giant breeds. The AKC lets dogs take part in its Agility Course Test from 15 months. For home training, keep puppies to ground-level games and very low bars.
- Non-slip ground. Use grass, packed dirt, rubber mats or artificial turf. Avoid concrete, tile and wet decking.
- Sand every cut edge. PVC leaves sharp burrs.
- Anchor everything outdoors. Use sandbags on the base legs. Tunnels need stakes or heavy bags at both ends.
- Warm up for 5 minutes with a brisk walk or easy trot, then cool down with a slow walk.
- Keep sessions short. Ten to fifteen minutes is plenty for beginners. Tired dogs get hurt.
- Check health first. If your dog has hip or elbow dysplasia, arthritis, back problems or any joint concern, ask your vet before starting jump work.
Cutting PVC? Wear safety glasses and gloves, work outdoors or in a ventilated space, and sweep up scraps so dogs don’t chew them.
My rule of thumb: Build ground-level and low-impact obstacles yourself. Buy, borrow or rent anything your dog stands on that is higher than a foot off the ground.
Tools and Materials
Tools
- PVC cutter or fine-tooth hacksaw
- Tape measure and marker
- Drill and bits
- Sandpaper (120 grit) or a deburring tool
- Safety glasses and gloves
Materials (for 2 jumps, 6 weave poles, 1 pause table)
- Schedule 40 PVC pipe: 1-inch (25 mm) and 1¼-inch (32 mm)
- PVC fittings: T-joints, end caps
- PVC cement (for base legs only)
- Plywood (about 3/4 inch, 19 mm) and 2×4 lumber for the table
- Rubber mat or outdoor non-slip carpet for the table top
- Sandbags or tent stakes
- A tunnel (bought or DIY, see below)
- Optional: exterior spray paint in a bright color for the bars
Tip: Paint or tape high-contrast bands on the bars so your dog can see the height clearly against grass.
Step-by-Step Builds
1. DIY Dog Jump (the Foundation)
This is the easiest build and the one you’ll use most. It also teaches the most important safety principle: the bar must fall.
Cut list for one jump (medium to large dog)
| Part | Pipe | Length | Qty |
|---|---|---|---|
| Uprights | 1¼-inch PVC | 40 in (100 cm) | 2 |
| Base legs | 1¼-inch PVC | 14 in (35 cm) | 4 |
| Jump bar | 1-inch PVC | 48 in (120 cm) | 1 |
| Bar pins | ½-inch PVC or dowel | 4 in (10 cm) | 2 to 4 |
For small dogs, shorten the uprights to 24 inches (60 cm) and the legs to 10 inches (25 cm).
How to build it
- Cut all pipe to length and sand the ends.
- Glue two legs into a T-joint so they point in opposite directions. Repeat for the second base.
- Press an upright into each T. Leave it dry-fit (not glued) so you can lift it out for storage.
- Drill holes through each upright every 2 inches (5 cm) from the bottom. Drill both walls of the pipe in a straight line, using a drill guide or a steady helper. Test that a pin slides through freely.
- Slide a pin through the hole for the height you want. The bar rests on top of the pins, not through them.
- Add sandbags on the legs for outdoor use.
- Test it. Tap the bar with your hand. It should roll off cleanly.
Honest shortcut: Jump cups are cheap to buy and easier than drilling. If you don’t have a drill guide, buy a pair of plastic cups and attach them to the uprights instead.
Cheap starter alternative: For a puppy or first session, lay a pole across two buckets or bricks at 4 inches (10 cm). No building needed.
2. DIY Weave Poles
Weave poles are the hardest skill most dogs learn. A good build is stable, spaced right and easy to adjust.
Specs
- 6 poles for a starter set (competition sets use up to 12)
- Pole height: about 36 to 40 inches (90 to 100 cm), 1-inch PVC
- Spacing: 24 inches (60 cm) center to center, the standard used in AKC agility
- Pole bases: each pole in a T-joint base with 10-inch (25 cm) legs, with a sandbag on the legs
Build it
- Cut 6 poles to 40 inches and 6 sets of 10-inch legs.
- Glue each base. Dry-fit the pole in the stem.
- Cap the top of each pole with an end cap to protect the dog’s nose and hide sharp edges.
- Mark a 24-inch spacing line on the ground and place the poles on it.
- Wrap a bright tape band at the same height on each pole.
Teaching it
Two methods work well:
- Channel method: Set poles in two staggered rows with a clear lane between them, then slowly slide the rows together into one line.
- 2×2 method: Start with just two poles angled open, reward the weave through them, then add pairs one at a time. Many competition trainers prefer this because it builds independent weaving.
Weave poles take time. Don’t judge your dog’s brain by how fast they learn them.
3. Tunnel: Build or Buy?
This is where I’m going to push back on a common tip. Many guides say a kids’ play tunnel works the same as an agility tunnel. For a first week of introduction, it can. But it often falls short for three reasons: it’s light and shifts when the dog hits it, it can be too narrow for big dogs and fast dogs shred soft fabric quickly. One agility instructor I read says she has never built a homemade tunnel that lasted more than a few sessions and recommends buying a basic open tunnel instead, some of which cost under $40.
My advice:
- Small dogs and puppies: a play tunnel is fine for introduction.
- Medium and large dogs: buy a basic open agility tunnel. Look for about 24 inches (60 cm) in diameter and 10 to 15 feet (3 to 4.5 m) in length.
- If you do build one: use flexible wire coil for the frame, wrap it in heavy ripstop or tarp, and tape the seams on the outside edge facing away from the dog. Check that no wire ends stick out.
Either way, stake or weigh both ends. A shifting tunnel is one of the fastest ways to frighten a dog off the obstacle.
Teach it: Scrunch the tunnel to 2 feet (60 cm) so your dog sees daylight. Reward at the exit. Lengthen it a little at a time.
4. DIY Pause Table
The table teaches control. The dog stops and holds a position. In AKC trials the dog must stay on the table for 5 seconds, so that’s your goal.
Build it
- Top: plywood about 3 feet by 3 feet (90 cm by 90 cm), or smaller for tiny dogs
- Frame: 2×4 lumber with cross braces so it doesn’t wobble
- Height: start at 4 to 8 inches (10 to 20 cm) for training, whatever your dog’s size
- Surface: glue a rubber mat or outdoor carpet to the top
Test it by standing on it and rocking. If you feel any wobble, add braces.
5. Tire Jump (Optional)
Use a hula hoop or a bicycle tire wrapped in foam pipe insulation. Hang it in a PVC frame with bungee cord so it can swing on contact. For your first sessions, lay the hoop flat on the grass and let your dog step through, then raise it little by little. Never fix the hoop rigidly in place.
6. Low Plank Walk (Safe Substitute for Contact Obstacles)
The A-frame, dog walk and seesaw teach “contact zones,” but they are also where most serious falls happen. Here’s a safer way to start building the same skills.
- Lay a plank at least 12 inches (30 cm) wide and 6 to 8 feet (about 2 m) long flat on the ground.
- Cover it with non-slip material.
- Reward your dog for walking down the plank and stopping with front paws on the end.
- Later, raise it by no more than a few inches on flat blocks, with the plank fully supported.
This builds balance and target behavior with almost no fall risk. If you want to progress to real contact equipment, use a club’s gear under an instructor.
What NOT to Build at Home
Skip homemade dog walks, A-frames and full-height seesaws. Several “easy plan” pages online show them, but the risk isn’t worth it. A board that’s too narrow, too slippery or even slightly unstable can send a dog off the edge from a height. Look for local agility clubs, many of which offer open-practice hours.
Jump Height Chart (Measure Your Dog First)
AKC jump heights are based on height at the withers (the top of the shoulder blades). Measure your dog standing square on a flat floor.
| Dog’s height at withers | AKC jump height | Broad jump width* |
|---|---|---|
| 11 in (28 cm) and under | 8 in (20 cm) | 16 in (40 cm) |
| 14 in (36 cm) and under | 12 in (30 cm) | 24 in (60 cm) |
| 18 in (46 cm) and under | 16 in (40 cm) | 32 in (80 cm) |
| 22 in (56 cm) and under | 20 in (50 cm) | 40 in (100 cm) |
| Over 22 in (56 cm) | 24 in (60 cm) | 48 in (120 cm) |
In AKC agility, the broad jump is twice the jump height.
How to use this at home
- Start at 4 inches (10 cm) for every dog, whatever the chart says.
- Raise the bar a little each week as your dog stays smooth.
- Home training height should stay at or below the chart height. For puppies, seniors and dogs with joint issues, stay lower.
- Senior dogs: many handlers drop jump height by 2 to 4 inches around 8 to 10 years old. The AKC’s Preferred class also lets older or injured dogs jump one division lower.
- UK and European clubs use their own height categories. If you plan to compete, check your national club’s chart.
Backyard Course Layouts (Big Yard and Small Space)
Layout A: Standard yard (about 30 x 40 feet, or 9 x 12 m)
- Tunnel first. Dogs love it, and it builds confidence.
- Jump 10 to 15 feet (3 to 4.5 m) after the exit.
- Weave poles, with 8 to 10 feet (about 3 m) of runway before them.
- Second jump.
- Pause table last, so every run ends with a calm stop.
Keep at least 10 feet (3 m) between obstacles. Change the order every week or two. Smart dogs get bored and start to guess.
Layout B: Small yard or balcony (under 15 x 15 feet, or 4.5 x 4.5 m)
- Use one jump, a short tunnel and a table.
- Run one obstacle at a time (“obstacle of the day”) instead of sequences.
- Work in a straight line, and use turns only after your dog is confident.
Layout C: Indoor or rainy day
- Cavaletti: 4 to 6 poles on the floor, about 1.5 to 2 feet apart for medium dogs, for rhythm and body awareness
- Low jump at 4 inches (10 cm) on a rubber mat
- Hoop on the floor
- Targeting and “station” games on a mat
4-Week Training Plan
This plan assumes a healthy adult dog who knows basic cues. If your dog still struggles with “wait” and “come,” fix that first. Our guide to dog obedience commands that work covers the five you need.
| Week | Focus | Session length | Goal |
|---|---|---|---|
| 1 | Tunnel (scrunched), pole on the ground | 10 min | Dog runs through happily and steps over a ground pole |
| 2 | Jump at 4 in (10 cm), pause table at low height | 10 to 15 min | Clean jump on cue, four paws on table for 3 seconds |
| 3 | Raise jump slowly, add two weave poles (2×2 method) | 15 min | Smooth jump, enters weaves from both sides |
| 4 | Link tunnel, jump and table | 15 min | Two-obstacle sequences with rewards between |
Rules for every session
- Warm up for 5 minutes.
- Rewards on the move: treats or a tug toy, thrown or delivered at the end of the obstacle.
- End while your dog still wants more.
- Rest days matter. Two to three sessions a week is plenty.
Realistic timelines: Tunnel and low jumps can click in 1 to 3 weeks. Weave poles often take 8 to 16 weeks. A confident, connected full course usually takes 4 to 6 months of steady practice. If someone promises agility mastery in a weekend, they’re not being honest.
Not sure how much exercise your dog needs on top of agility? See how often to exercise a working dog.
Troubleshooting: When Your Dog Won’t Play Along
| Problem | Likely cause | Fix |
|---|---|---|
| Dog won’t enter the tunnel | It’s dark or scary | Scrunch it short, reward at the exit, toss treats inside |
| Dog runs around the jump | Doesn’t understand the job, or the bar looks scary | Lower to ground level, use wings or add a guide rope, reward the jump |
| Dog knocks every bar | Bar too high, rushing, or poor timing | Drop the height, add a cavaletti before the jump to slow stride |
| Dog pops out of the weaves | Poles too close in your mind, or you moved too fast | Go back to channel or 2×2, reward every correct entry |
| Dog bolts off the table | Surface is slippery, or the release isn’t clear | Add non-slip matting, teach a calm release word |
| Dog loses focus after a few minutes | Session too long or reward not exciting enough | Shorten sessions, use higher-value treats or a favorite toy |
| Dog is fearful of the equipment | Too much too soon | Return to the start, let the dog sniff and explore, reward any approach |
If your dog yelps, limps, or refuses to jump after a landing, stop and call your vet.
Weather, Surfaces and Maintenance
- Sun and heat: PVC gets brittle in strong sun over time, and dark pipe can get hot. Store gear in shade. In hot climates, train early morning or evening, and test the ground with the back of your hand for 5 to 7 seconds. If it’s too hot for you, it’s too hot for paws. Dogs that overheat can reach dangerous body temperatures above 104°F (40°C), so watch for heavy panting and slow recovery.
- Cold: PVC cracks more easily in freezing weather. Check pipes before each session.
- Rain: Dry tunnels and tires after use to prevent mildew. Wet grass makes landings slippery, so lower the jump or move indoors.
- Wind: Stake or weigh down every obstacle.
Before every session (60-second check)
- Look for cracks, splits or sharp edges
- Check that pins and cups sit firmly
- Make sure bases don’t wobble
- Walk the ground for holes, stones and debris
- Confirm no zip-tie ends or wire stick out of the tunnel
Storage: Dry-fit pieces come apart, so store poles and bars flat, out of direct sun. Retire any pipe with a crack.
Cost: DIY vs Store-Bought
These are rough, planning-level numbers. Prices vary by country and store.
| Item | DIY (approx.) | Store-bought (approx.) |
|---|---|---|
| 1 jump | $10 to $20 | $60 to $150 |
| 6 weave poles | $20 to $40 | $100 to $250 |
| Tunnel | $15 to $40 (basic bought tunnel) | $80 to $200 |
| Pause table | $20 to $40 | $150 to $300 |
| Starter set | $65 to $140 | $400 to $1,200+ |
Even after paying for a few extras like cups, sandbags and a bought tunnel, you’ll likely save several hundred dollars. I’d spend part of that on a few lessons with a qualified agility instructor.
Breed and Age Guide
- Puppies under 12 months: Ground-level games only: targeting, recall through a tunnel, walking over flat boards. No jumping, no weaving, no repetitive turns.
- Giant breeds (Great Danes, Mastiffs): Growth plates may stay open until 18 to 24 months. Keep jumps near the ground until your vet clears them.
- Brachycephalic breeds (Bulldogs, Pugs, Frenchies): Keep sessions short and avoid heat. Watch breathing.
- Long-backed breeds (Dachshunds, Corgis): Keep jumps low and avoid tight, twisting turns until they’re well conditioned.
- Working breeds (Malinois, German Shepherds, Border Collies): Fast, driven and willing to ignore pain. Cap your session length yourself, and watch for flat landings or favoring a leg.
- Senior dogs: Use low jumps, wide tunnels and slow games. Skip long weave sessions if arthritis is present.
Building the foundation for a young dog? Keep it to calm structure and ground-level games until your vet clears jumping.
Frequently Asked Questions
1. Is homemade dog agility equipment safe?
Yes, for ground-level obstacles like jumps, weave poles, tunnels and pause tables, as long as jump bars fall off on contact and the ground is non-slip. Skip homemade contact obstacles such as A-frames, dog walks and seesaws.
2. What size PVC is best for DIY dog agility equipment?
Use 1¼-inch Schedule 40 PVC for jump uprights and base legs, and 1-inch PVC for jump bars and weave poles. Bigger pipe resists bending, and the 1-inch bar is light enough to fall off easily.
3. How much does a DIY agility course cost?
A starter set with jumps, weave poles, a tunnel and a pause table usually costs about $65 to $140 in materials. Comparable store-bought starter sets often run $400 to $1,200 or more.
4. When can a puppy start agility?
Puppies can start ground-level games early, such as targeting and walking over flat boards. Hold off on real jumping and weaving until your vet says growth plates have closed, usually after 12 months for small and medium breeds and 18 to 24 months for giant breeds. The AKC’s Agility Course Test is open to dogs 15 months and older.
5. How long does it take to train a dog on a full course?
Tunnels and low jumps can click in 1 to 3 weeks. Weave poles often take 8 to 16 weeks. Most dogs need 4 to 6 months of steady, short sessions before they run a connected course with confidence.
Conclusion and Next Steps
Building DIY dog agility equipment isn’t hard, but doing it safely takes care. Build the ground-level obstacles yourself, keep every jump bar loose so it falls, space your weave poles 24 inches apart, and measure your dog before you set a single height. Buy a basic tunnel if you have a medium or large dog, and leave the contact obstacles to a club.
Here’s your weekend plan:
- Measure your dog’s height at the withers.
- Buy PVC, T-joints, end caps and a pair of jump cups.
- Build one jump and a 6-pole weave set.
- Set the jump at 4 inches and start Week 1 of the plan.
- Do the 60-second safety check before every session.
Want a full step-by-step system for building a calm, focused dog, from obedience to advanced work? Grab my book, Beyond the Bark: Inside a Pro Handler’s Playbook for Raising the Ideal Dog. It covers the same field-tested principles I use with working dogs.
Get weekly K9 training tips. Join our weekly articles roundup newsletter: subscribe here.
Safety note: This article is general education, not veterinary advice. Ask your vet before starting agility, especially with puppies, seniors and dogs with joint conditions.

Her work centres on obedience, detection, protection and operational readiness. She favours proven methods built on repetition, consistency and real-world conditioning, so that both dogs and handlers are prepared for high-pressure tasks.
Rofiat represented the Nigerian Army Dog Centre at the Nigerian Army Day Celebration (NADCEL) 2026, where she led demonstrations in obedience, explosive detection, agility and tactical movement. Through articles, training content and documentaries, she shares field-based insight into how structured training, clear communication and trust between handler and dog affect performance and reliability.
She is the author of Beyond the Bark: Inside a Pro Handler's Playbook for Raising the Ideal Dog, a practical guide that helps dog owners and handlers apply professional training principles in everyday situations.
- Can You Handle a Cane Corso Puppy? 7 Hard Truths - October 23, 2026
- How to Train a Stubborn Pug: A K9 Trainer’s Real Guide - October 22, 2026
- Dog Hotel Prep: 7 Must-Haves Before Boarding - October 21, 2026