Puppy Pee Pad Training: A Simple 4-Step Guide
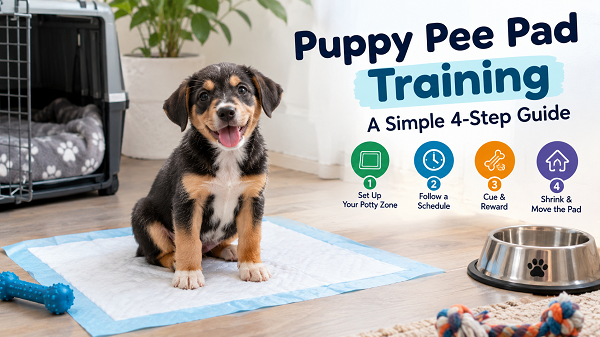
Puppy pee pad training works in four steps. First, set up one small potty zone with a pad. Second, take your puppy to that pad on a tight schedule, especially after waking, eating, and playing. Third, cue, cheer, and treat the moment your puppy finishes. Fourth, shrink or move the pad once your puppy hits it every time. Many puppies get the idea in two to four weeks, but full reliability can take a few months.
Table of Contents
- What Puppy Pee Pad Training Really Is (and When It Makes Sense)
- Before You Start: Pads, Placement, and Setup
- Step 1: Build a Small Potty Zone
- Step 2: Set a Schedule and Watch Your Puppy
- Step 3: Cue, Guide, and Reward
- Step 4: Shrink the Pad and Plan Your Exit
- A Sample Day of Pad Training
- Troubleshooting: 7 Common Pad Problems
- Mistakes That Slow Progress
- Special Situations: Apartments, Small Breeds, Big Breeds, and Adult Dogs
- What K9 Handling Taught Me About Potty Training
- FAQs
- Conclusion
Introduction
You bring home a new puppy, and within an hour there’s a puddle by the sofa. Sound familiar? Maybe you live in an apartment on the 12th floor. Maybe the weather is awful, your puppy isn’t fully vaccinated yet, or you’re out at work for long stretches. Puppy pee pad training can solve a lot of those problems, but only if you do it right.
Here’s the catch. Most guides give you three or four vague tips and stop there. They don’t tell you how often your puppy needs the pad, what to do when your pup pees next to it, or how to stop the pad from becoming a forever habit. That’s where owners get stuck.
In this guide, I’ll walk you through four simple steps, a sample daily schedule, a troubleshooting section for the problems that actually come up, and a clear plan to move your puppy outside if that’s your goal. Whether you’re a first-time owner or a handler with years of kennel experience, you’ll find something useful here.
What Puppy Pee Pad Training Really Is (and When It Makes Sense)
A puppy pee pad is an absorbent sheet that gives your puppy an approved spot to go indoors. Training means teaching your puppy that the pad, and only the pad, is the bathroom.
The American Kennel Club’s own training team puts it plainly: going outside is the ideal long-term solution, but pads can play a useful role in the process. That’s a fair way to look at it. Pads are a tool, not a magic fix.
When Pads Make Sense
Pads work best in these situations:
- You live in a high-rise or a place with no easy outdoor access.
- Your puppy is very young and needs to pee every hour or so.
- Your puppy isn’t fully vaccinated yet, and your vet has asked you to limit outdoor exposure.
- You work long hours and can’t get home for midday breaks.
- Bad weather, illness, or mobility problems make outdoor trips hard for you or your dog.
- You have a tiny breed that struggles in cold or wet conditions.
When Pads Can Backfire
Vets and trainers also warn about the downsides. Some puppies learn that peeing indoors is fine and then resist going outside later. Pads can cost a lot over time, and disposable ones create waste. Some puppies treat pads as chew toys.
So here’s my rule: decide your end goal before you start. Do you want an outdoor dog, an indoor-only dog, or a dog that uses both? Your answer changes how you do Step 4.
Pads vs. Going Outside: Quick Comparison
| Factor | Pee pads | Outdoor training |
|---|---|---|
| Convenience | High, works any hour and any weather | Lower, needs you to go with your puppy |
| Cost | Ongoing (pads, holders, cleaner) | Mostly free |
| Risk of mixed signals | Higher if you plan to go outdoors later | Lower |
| Good for apartments | Yes | Depends on access |
| Good for sick or senior dogs | Yes | Harder |
| Long-term goal | Needs a clear plan | Straightforward |
Before You Start: Pads, Placement, and Setup
A little prep saves weeks of frustration. Get these things ready first.
Choose the Right Type of Pad
| Pad type | Best for | Watch out for |
|---|---|---|
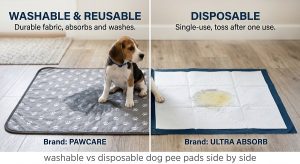
| Disposable | Beginners, travel, very young puppies | Cost adds up, and puppies may shred them |
| Reusable (washable) | Long-term use, eco-conscious owners | Need regular washing, and odors can build up |
| Grass-style or real-grass pads | Puppies you plan to move outdoors | Real-grass pads need replacing, and fake turf needs rinsing |
| Attractant pads | Puppies who ignore plain pads | Some dogs don’t care about the scent |
| Charcoal or odor-control | Small homes and apartments | May cost more |
If you’re planning to go outdoors later, I like grass-style pads. They give your puppy a surface that feels a bit like the real thing.
Pick the Right Size
Buy bigger than you think. A small pad works for a toy breed, but a Labrador or German Shepherd puppy will overshoot it by week three. A pad holder or tray with a low edge helps keep the pad flat and stops your puppy from dragging it around.
Pick the Right Spot
Choose a quiet area away from food, water, and the bed. Dogs naturally avoid soiling where they eat and sleep. A bathroom, laundry room, or a corner of a puppy pen works well. Pick one spot and stick with it. Moving the pad around mid-training confuses your puppy because the location is part of what they’re learning.
Gather Your Supplies
- Pads and a holder
- An enzymatic cleaner (it breaks down urine odor so your puppy doesn’t return to old spots)
- Small, soft treats your puppy loves
- A puppy pen or baby gates
- A timer or phone alarm
- A cue word, such as “go potty”
Step 1: Build a Small Potty Zone
This is the step most people skip, and it’s the biggest reason pad training fails. If your puppy has a whole house to roam, you can’t watch them, and they’ll have an accident out of sight.
Pick Your Method
Trainers use a few approaches. Here are the three I see most often:
- Single pad in a pen. Use a puppy pen with a bed on one side and a pad on the other. This is the simplest option and my usual starting point.
- Room of pads. Cover the floor of a small confined area with pads. When your puppy uses one, replace it and slowly remove the others until one is left. This works well for puppies who miss a single pad.
- Pad plus supervised free time. Once your puppy hits the pad reliably, you open up more space under watch.
One caution: don’t put the pad inside a crate. Crates teach bladder control because puppies don’t like soiling their sleeping space. A pad in the crate undoes that lesson. If you want to know how to build that skill properly, read our guide to how to crate train a puppy with K9 trainer tips.
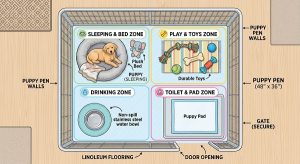
Set It Up
- Put the bed and water on one side of the pen.
- Place the pad on the far side, with a few feet between them.
- Add a toy or two on the bed side only.
- Keep the pad flat, and replace it as soon as it’s soiled or wet.
Step 2: Set a Schedule and Watch Your Puppy
Puppies don’t “know” where to go. They learn through repetition. Your job is to put them on the pad before they have a chance to go anywhere else.
How Long Can a Puppy Hold It?
A common rule of thumb says a puppy can hold their bladder for about one hour per month of age. Some trainers add one hour to that number. University veterinary programs, including Penn Vet and Ohio State’s indoor pet program, give the same “one hour per month, give or take an hour” guideline. Treat it as a maximum, not a target. Most puppies need to go much sooner.
Here’s a practical planning guide:
| Puppy age | Typical maximum hold time | Plan a pad trip about every |
|---|---|---|
| 8–10 weeks | 2–3 hours | 45–60 minutes |
| 3–4 months | 3–4 hours | 2–3 hours |
| 5–6 months | 4–6 hours | 3–4 hours |
| 6+ months | 6 hours or more | 4–5 hours |
These are rough numbers. Small breeds, very active puppies, and nervous puppies often need more frequent breaks.
Know the Trigger Moments
Take your puppy to the pad at these times, every time:
- Right after waking up (the bladder is fullest after sleep)
- About 5 to 30 minutes after eating or drinking
- After play or excitement
- After a nap
- Before bed
- Any time there’s a change in activity, like a guest arriving
Learn Your Puppy’s Tells
Long before a puddle appears, your puppy usually gives a signal:
- Sniffing the floor in a pattern
- Circling
- Whining or suddenly stopping play
- Wandering off to a corner or behind furniture
The second you see one, scoop up your puppy and put them on the pad. Don’t wait to be sure.
Feed on a Schedule
A predictable feeding routine makes potty times predictable. Offer meals at set times and pick up the bowl after about 15 minutes. Then count forward: your puppy will usually need the pad within half an hour.
Want a full outdoor schedule alongside your pad plan? Our 7-day puppy potty training schedule pairs well with this guide.
Step 3: Cue, Guide, and Reward
Now comes the teaching moment. Your timing here matters more than almost anything else.
Walk Your Puppy to the Pad
Bring your puppy to the pad calmly. Stand still. Don’t play. Say your cue word once, quietly, like “go potty.” Then wait. Give your puppy a minute or two to sniff and settle. If nothing happens, calmly take them back to the pen and try again in 10 to 15 minutes.
Reward the Second They Finish
This is the core of the whole method. When your puppy pees on the pad, praise softly while they’re going, then reward right as they finish. Treat within a couple of seconds. If you wait until you’re back across the room, your puppy won’t link the treat to the pad.
Use a treat that’s special. Save it for potty rewards only.
Use Scent to Teach
Dogs return to spots that smell like a bathroom. Use that to your advantage:
- If your puppy has an accident on the floor, blot some urine with a paper towel and place it on the pad.
- Clean the floor spot fully with an enzymatic cleaner.
- Don’t wash the pad completely clean in the early days, especially if it’s disposable. A faint scent helps your puppy find it again.
If You Catch Your Puppy Mid-Accident
Don’t yell. Calmly pick them up and place them on the pad. If they finish there, reward them. Yelling or punishing after the fact only teaches your puppy to hide when they go, and that makes training harder.
Keep Notes
For the first week, jot down when your puppy goes, where, and whether it was a hit or a miss. After a few days you’ll see a pattern, and that pattern is your real schedule.
Step 4: Shrink the Pad and Plan Your Exit
Once your puppy hits the pad about 90 percent of the time for a week, you’re ready for the next stage. What you do depends on your goal.
Path A: Keep Using Pads Indoors
Some owners, especially in high-rise apartments or with tiny breeds, keep pads for life. That’s a valid choice. Just do these things:
- Keep the pad in one fixed spot.
- Switch to a reusable or grass-style pad if cost or waste bothers you.
- Give your dog regular outdoor time anyway for exercise and mental stimulation.
Path B: Move to Outdoor Potty Training
The AKC suggests moving the pad gradually toward the exit, then just outside the door, then to the final outdoor spot. I agree with that approach. Here’s the version I use.
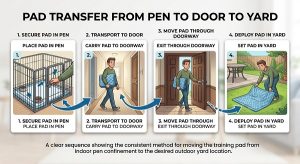
- Move the pad a few feet at a time. Shift it toward the door every two or three days, but only after your puppy has used it correctly several days in a row.
- Put the pad right at the door. Let your puppy use it there for a few days.
- Take the pad outside. Place it in the exact spot you want your dog to use. Walk your puppy there on leash, use your cue, and reward.
- Shrink the pad. Cut it smaller or use a smaller one each few days.
- Remove the pad. Your puppy should now go on the bare ground. If they hesitate, put a small piece of pad or a soiled paper towel in the spot as a scent cue.
If you slip back, go back one step. That’s normal, not a failure.
Vaccines and Outdoor Safety
If your puppy isn’t fully vaccinated, ask your vet which outdoor areas are safe and when. Your own garden or yard is often considered lower risk than public parks or pavements, but your vet knows your local disease risks best. Pads let you start training safely in the meantime.
A Sample Day of Pad Training
Here’s a sample routine for a 10-week-old puppy. Adjust it to your puppy and your own schedule.
| Time | What happens |
|---|---|
| 6:30 AM | Wake up, straight to the pad, cue, reward |
| 7:00 AM | Breakfast |
| 7:20 AM | Pad trip after eating |
| 8:00 AM | Short play, then pad trip |
| 9:00 AM | Pad trip, then nap in the pen |
| 10:30 AM | Wake, pad trip |
| 12:00 PM | Lunch, then pad trip 20 minutes later |
| 1:00 PM | Play, then pad trip |
| 2:30 PM | Nap, then pad trip on waking |
| 5:30 PM | Dinner, then pad trip |
| 7:00 PM | Play, then pad trip |
| 9:30 PM | Last pad trip, then bed |
| Overnight | Expect one or two trips at this age |
Notice how many pad trips there are. That’s the point. More trips mean fewer accidents, and fewer accidents mean faster learning.
Troubleshooting: 7 Common Pad Problems
1. My Puppy Pees Next to the Pad
This is the most common issue. Usually the pad is too small, or your puppy doesn’t recognize the pad edge. Try a bigger pad, or put two side by side. Blot the miss with a paper towel and place it on the pad. Clean the floor spot well.
2. My Puppy Shreds or Plays With the Pad
This often means the puppy is bored or teething. Use a holder or tray to keep the pad flat. Offer chew toys in the play area. Try a washable fabric pad, which is harder to rip. Stay close during pad trips and take your puppy away if they start to play.
3. My Puppy Pees on the Pad but Poops Elsewhere
Peeing and pooping are different habits. Watch for pooping signs, which often come right after meals. Praise heavily when a poop lands on the pad. Some puppies want more privacy for poop, so try moving the pad to a quieter corner.
4. My Puppy Walks Past the Pad and Goes Elsewhere
The pad probably doesn’t feel like the right surface. Try an attractant pad or a grass-style pad. If your puppy was raised on grass or soil, they may prefer that texture. Some trainers use a real-grass pad in this case.
5. My Puppy Was Doing Great, Then Started Having Accidents
Regression is common during growth spurts and big life changes. But sudden changes can also signal a urinary tract infection or another medical problem. If accidents jump suddenly, or you see straining, blood, or heavy drinking, call your vet. I’m a trainer, not a vet, so don’t wait on this one.
6. My Puppy Uses the Pad but Refuses to Go Outside
This is the mixed-signals issue. Use Path B above. Take your puppy outside on leash, stay with them, and reward heavily when they go. A pad outdoors can bridge the gap.
7. My Large-Breed Puppy Overshoots the Pad
Use extra-large pads, or lay two or three side by side. Move the pad to a spot with a wall behind it so your puppy has a clear target. Start shifting outdoors earlier, because large breeds outgrow pads quickly.
Mistakes That Slow Progress
Avoid these, and you’ll save yourself weeks:
- Giving too much freedom too soon. Space should grow slowly, as your puppy proves they get it.
- Punishing accidents. It creates fear, not understanding.
- Skipping the reward. A pat isn’t enough. Use a real treat at first.
- Changing the pad spot. Pick one place and stay there.
- Using strong-smelling cleaners. Ammonia-based products can smell like urine to a dog. Use an enzymatic cleaner.
- Leaving a young puppy alone too long. Respect the bladder limits in the table above.
- Letting the pad run out. A dry, clean pad is fine. A saturated one pushes your puppy to find a new spot.
- Giving up too soon. Most dogs are reliably trained by four to six months, but some need up to a year. A rough week isn’t a failed puppy.
Special Situations: Apartments, Small Breeds, Big Breeds, and Adult Dogs
Apartments and Working Owners
If you’re gone for hours, set up a puppy pen with a pad and plan midday breaks, even a short visit from a friend or a dog walker. Long stretches alone push puppies to their limits.
Small and Toy Breeds
Tiny bladders mean tiny holding times. Many toy breeds are tough to housebreak, and pads are a common tool for them. If you have a Chihuahua, Pomeranian, Yorkie, Shih Tzu, or Pekingese, read our guide to the 5 hardest toy dog breeds to housebreak for breed-specific fixes.
Big Breeds
Big puppies grow fast. Pads work for the first few weeks, but plan to go outdoors early. A 60-pound adolescent dog on a pad isn’t practical for most homes.
Adult and Rescue Dogs
The same four steps work for adult dogs, and adults often learn faster because they have better bladder control. If an adult keeps having accidents, rule out medical problems and stress with your vet first.
What K9 Handling Taught Me About Potty Training
In kennel and handler work, elimination is managed by routine, not by hope. Dogs go out at set times, in a set spot, with a set cue, and handlers watch for tells. When something changes in a dog’s pattern, we treat it as information, not bad behavior.
That mindset transfers perfectly to a pet puppy. You’re not waiting for your puppy to “figure it out.” You’re building a predictable system and rewarding the right result. The handlers who struggle are usually the ones who skip the schedule. The ones who succeed are almost boring about it.
If you like this kind of structured thinking, my e-book Beyond the Bark: Inside a Pro Handler’s Playbook for Raising the Ideal Dog breaks down how working-dog handlers build reliable habits that pet owners can use at home.
Medical note: I’m a K9 trainer, not a veterinarian. If your puppy shows pain, straining, blood in urine, or sudden changes, see your vet.
FAQs
1. How long does puppy pee pad training take?
Many owners see good progress in two to four weeks. Full reliability often takes four to six months, and some dogs need closer to a year. Consistency matters more than the calendar.
2. Should I use pee pads or train my puppy outside from day one?
Outside is the ideal long-term goal for most owners, according to the AKC. But pads are a good tool for apartments, young puppies, bad weather, or until your vet clears outdoor exposure. If you want an outdoor dog, plan your exit from the start.
3. Why does my puppy pee next to the pad?
Usually the pad is too small, the edge isn’t clear, or the puppy hasn’t linked the scent and surface to the bathroom. Use a larger pad, put a scent-marked paper towel on it, and clean the missed spot thoroughly.
4. How do I switch my puppy from pads to going outside?
Move the pad gradually toward the door, then just outside, then to your chosen outdoor spot. Shrink the pad over time and remove it. Reward every successful outdoor trip.
5. Can adult dogs learn to use pee pads?
Yes. The steps are the same. Adults can often hold their bladder longer, so training can move faster. If an adult dog starts having accidents out of the blue, check with your vet first.
Conclusion
Puppy pee pad training isn’t complicated, but it does take patience. Set up one small potty zone. Build a schedule around waking, eating, and playing. Cue, guide, and reward the second your puppy finishes. Then shrink the pad and decide whether it’s staying indoors or heading outside.
If you do one thing today, make a schedule and stick to it. Count how many pad trips your puppy gets in a day. If it’s fewer than you expected, add more.
Want more practical, trainer-tested tips like this one? Subscribe to our weekly articles roundup newsletter at arfsk9team.com.ng/newsletter and get new guides in your inbox every week.
Sources consulted: American Kennel Club (potty pad training guidance), Penn Vet and Ohio State University indoor pet housetraining guidance, and trainer and retailer guides from Rover, PetSmart, Dogster, Hepper, and Wag Walking.

Her work centres on obedience, detection, protection and operational readiness. She favours proven methods built on repetition, consistency and real-world conditioning, so that both dogs and handlers are prepared for high-pressure tasks.
Rofiat represented the Nigerian Army Dog Centre at the Nigerian Army Day Celebration (NADCEL) 2026, where she led demonstrations in obedience, explosive detection, agility and tactical movement. Through articles, training content and documentaries, she shares field-based insight into how structured training, clear communication and trust between handler and dog affect performance and reliability.
She is the author of Beyond the Bark: Inside a Pro Handler's Playbook for Raising the Ideal Dog, a practical guide that helps dog owners and handlers apply professional training principles in everyday situations.
- How to Safely Approach Stray Dogs: 5 Field Rules - November 22, 2026
- Food Aggression Dog Training: Pro K9 Guide - November 21, 2026
- DIY Dog Scent Training: Easy 4-Week Home Guide - November 20, 2026