Essential Dog Agility Equipment for Home Training
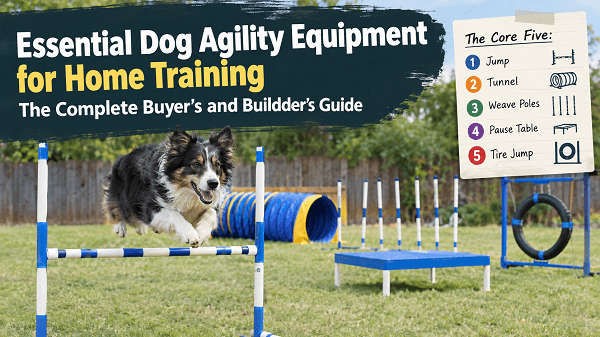
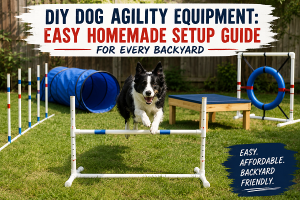
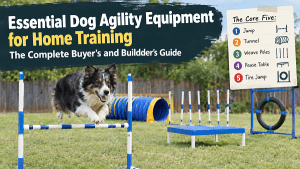
The essential dog agility equipment for home training is a set of five core obstacles: a single adjustable jump, a collapsible tunnel, a set of weave poles, a pause table (or box), and a tire jump. Most handlers can build or buy this starter set for $150 to $350, and it covers 90% of the foundational skills a dog needs before ever touching contact equipment like an A-frame or dog walk, which are better left to a trainer’s supervised setup because of the injury risk they carry.
If you only remember one thing from this guide, remember that: start small, start safe, and add equipment as your dog’s skill (not your excitement) grows.
Table of Contents
- Why Bother Building a Home Agility Course?
- The Core Five: Equipment Every Home Course Needs
- Regulation Dimensions: AKC, UKC, and Kennel Club Standards
- DIY vs. Buying: A Real Cost Breakdown
- Setting Up a Safe Home Course: Space and Layout
- Age, Breed, and Health: Who Should (and Shouldn’t) Jump Yet
- A Realistic Training Timeline
- Common Mistakes First-Time Handlers Make
- Meet the Trainer Behind This Guide
- FAQs
- Conclusion and Next Steps
Why Bother Building a Home Agility Course?
Ever watched a Border Collie fly through a weave pole set on TV and thought, “I wonder if my dog could do that”? I get asked this almost every week, and my answer is always the same: yes, almost certainly, and you don’t need a warehouse-sized training facility to start.
Dog agility isn’t just a spectator sport anymore. The sport traces back to 1978, when Crufts committee member John Varley asked working trials trainer Peter Meanwell to fill a gap in the schedule between the obedience and breed judging. Meanwell built a jumping course with a tire, weave flags, and a “catwalk” (later renamed the dog walk), and it was such a hit with the crowd that The Kennel Club made it an official sport by 1980. It jumped the Atlantic in the mid-1980s when Kenneth Tatsch saw it at Crufts and brought it home to Texas, eventually helping found the United States Dog Agility Association (USDAA).
Nearly five decades later, agility is one of the fastest-growing dog sports on the planet, and home training has exploded right alongside it. Here’s why it’s worth your time and garage space:
- Mental exhaustion, not just physical. Ten minutes of focused agility work tires a dog out mentally in a way that a 30-minute walk simply can’t. If you’ve got a working breed with energy to burn, this matters, see our breakdown of how often you should exercise a working dog for how agility fits into a weekly routine.
- It builds real communication. Agility forces you and your dog to read each other’s body language at speed. That carries over into everyday obedience, leash manners, and impulse control.
- It’s genuinely one of the cheapest dog sports. Compare a $200 starter kit to the cost of a boat, a horse, or even a decent mountain bike, and agility starts looking like a bargain hobby.
- You don’t need a trial to enjoy it. Most dogs who do home agility never see a competition ring, and that’s completely fine. It’s exercise and enrichment first, sport second.
Now let’s get into exactly what you need to buy or build.
The Core Five: Equipment Every Home Course Needs
Walk into any big pet retailer’s agility aisle and you’ll see a dozen obstacle types staring back at you. Ignore most of them at first. Here’s the equipment that actually earns its keep in a home training program. (If you’re outfitting a working or protection-line dog more broadly, our essential K9 training equipment guide covers the gear list beyond agility, too.)
1. A Single Adjustable Jump
This is obstacle number one for a reason: it’s cheap, it’s safe, and it teaches the fundamental skill of jumping on command and reading a handler’s motion.
Look for a jump with:
- A bar that pops or falls easily if your dog clips it (this prevents the whole jump toppling onto your dog)
- Height adjustability from ground level up to at least 26 inches
- A stable but lightweight base you can move around your yard or living room
Cost: A single PVC jump kit runs $35 to $50 retail, or under $20 in materials if you build one yourself from ¾-inch to 1-inch Schedule 40 PVC pipe, T-joints, and jump cups. I’ve built a dozen of these over the years and the total material cost has never crept above $15 per jump.
2. A Collapsible Tunnel
Tunnels are the fastest obstacle to teach because most dogs find them naturally rewarding, especially if you toss a treat through the far end on the first few reps.
- Rigid tunnels (open on both ends) are easier for a beginner dog to understand.
- Collapsible or “chute” tunnels (with a closed fabric end) are trickier and usually introduced later, since the dog has to push through fabric it can’t see through.
Cost: A 10 to 15-foot rigid tunnel with sandbags for stability typically costs $40 to $80.
3. Weave Poles
This is the obstacle that separates “fun backyard game” from “actual agility training,” and it’s also the one that takes the longest to teach properly, usually 6 to 12 weeks of consistent short sessions for a dog to weave 12 poles reliably at speed.
A crucial safety note here: weave pole spacing has changed over the sport’s history. Older regulation called for 20 to 24-inch spacing; both the AKC and most FCI-affiliated clubs worldwide standardized on 24-inch spacing between poles by the mid-2000s because it puts less torque on a dog’s spine compared to tighter spacing. If you’re building your own, use 24 inches center-to-center and don’t tighten it up just to make the course “harder.”
Start with a 2×2 training set (just two poles) rather than dropping a dog straight into 12 full-height poles, this “2×2 method,” popularized by agility competitor Susan Garrett, breaks the skill down so the dog learns the weaving motion before speed is added.
Cost: A basic 6-pole set runs $25 to $45; a 12-pole competition-spec set with a channel or wire-guide system for training can run $150 to $300.
4. A Pause Table (or Pause Box)
The pause table teaches impulse control, your dog has to stop, get on the table, and hold a position (sit, down, or stand) for a set count, usually 5 seconds in competition. At home, a sturdy step stool, a low platform, or even a yoga block for small dogs works as a substitute while you’re just building the behavior.
Regulation pause tables measure 36 inches square, with height varying by jump division (typically 8, 16, or 24 inches depending on the dog’s size class).
Cost: $60 to $120 for a purpose-built table, or free if you repurpose a sturdy wooden platform you already own.
5. A Tire Jump
Tire jumps teach dogs to commit to a fixed opening rather than judging a bar’s height on the fly, which is a genuinely different skill from a standard jump. It’s also one of the more injury-prone obstacles if built poorly, so this is one obstacle where I’d rather you buy a commercial unit with a break-away or bungee-suspended tire than build one from a literal car tire and rope, which doesn’t give at all on impact.
Cost: $60 to $150 depending on adjustability.
What About A-Frames, Dog Walks, and Teeters?
I get this question constantly, and here’s my honest, experience-based answer: contact obstacles are the last thing you should add to a home course, not the first. The A-frame, dog walk, and teeter (seesaw) account for a disproportionate share of agility-related injuries because they combine height, movement, and a narrow contact zone the dog must touch with a paw before dismounting. A 2019 survey-based study published in Veterinary Record on agility-related injuries in dogs found the A-frame and dog walk were among the top three obstacles associated with reported injuries, alongside weave poles taken at excessive speed with improper form.
If you want to introduce contact equipment at home, use a low “contact trainer” board (just a few inches off the ground) to teach the behavior of touching the yellow zone before you ever bring in a full-height A-frame, and only under the guidance of a certified instructor.
Regulation Dimensions: AKC, UKC, and Kennel Club Standards
You don’t have to build to competition spec for home training, but knowing the numbers helps you avoid arbitrary DIY dimensions that make your dog’s job harder or riskier than it should be.
| Obstacle | AKC/Kennel Club Standard | Home Training Note |
|---|---|---|
| Jump height | 4″ to 26″, based on dog’s shoulder height | Start well below your dog’s competition height and raise gradually |
| Weave pole spacing | 24″ center-to-center (20″–24″ range historically) | Use 24″ from day one; don’t go tighter |
| Weave pole height | 40 inches | Standard PVC pipe height |
| Pause table | 36″ x 36″ square | Height varies 8″–24″ by jump division |
| A-frame apex height | 5’6″ (5’0″ for 4″/8″ jump heights) | Not recommended for unsupervised home use |
| Dog walk contact zone | Lower 42 inches of each ramp | Requires a non-slip surface when wet or dry |
These figures come from official AKC obstacle regulations and are echoed closely by the UK Kennel Club and international FCI rules, with only minor regional variation. If you ever plan to enter a sanctioned trial, training on regulation-spec equipment from the start saves you from having to “re-teach” your dog on unfamiliar dimensions later.
DIY vs. Buying: A Real Cost Breakdown
Here’s the honest math on outfitting a full starter course, based on current retail pricing and my own material receipts from builds over the past few years.
Full DIY Route (materials only):
- 1 PVC jump: ~$15
- 1 set of 6 PVC weave poles: ~$30
- Pause platform (repurposed): $0
- Tire jump: not recommended as full DIY, buy this one
- DIY subtotal (excluding tunnel and tire jump): ~$45
Budget Commercial Route:
- Jump set: $35–$50
- Tunnel: $40–$60
- Weave poles: $25–$45
- Pause table: $60–$90
- Tire jump: $60–$100
- Commercial subtotal: $220–$345
Hybrid Route (what I actually recommend for most beginners): Build your own jumps and weave poles, buy the tunnel and tire jump commercially for safety, and repurpose furniture for your pause platform.
- Hybrid subtotal: roughly $150–$200
A few money-saving tips I give every new handler:
- Check local agility clubs for secondhand equipment, clubs upgrade gear regularly and often sell used sets cheap.
- Buy weave poles with a slanted “channel” or “2×2” training system rather than fixed upright poles; it costs more upfront but saves you buying a second set later when you move from the training method to full spacing.
- Skip the “all-in-one 12-piece kit” marketing bundles unless you’ve priced out the individual pieces, sometimes they’re a genuine deal, sometimes they’re not.
Setting Up a Safe Home Course: Space and Layout
You need less space than you think. A 30 x 40-foot yard is enough for a basic five-obstacle sequence, and plenty of handlers train successfully in spaces as small as a two-car garage using just one or two obstacles at a time.
Ground rules for any home setup:
- Check your surface. Grass, rubber matting, or artificial turf are ideal. Concrete and hardwood floors are hard on joints and dangerously slippery for jumping and weaving, add a yoga mat or rubber runner under each obstacle if that’s all you have.
- Leave 10 feet of clearance around each obstacle. Dogs need room to land, turn, and recover, especially puppies and dogs still building coordination.
- Remove hazards from the flight path. Garden hoses, sprinkler heads, low branches, and loose gravel are the most common injury causes I see in home setups, not the equipment itself.
- Anchor lightweight equipment. Sandbags on tunnels and weighted bases on jumps stop a light gust of wind from turning your course into a hazard mid-session.
- Train in short sessions. Five to ten minutes, two or three times a day, beats one exhausting 45-minute session. Agility is high-impact; fatigue is when form (and joints) break down.
Age, Breed, and Health: Who Should (and Shouldn’t) Jump Yet
This is the section I wish more articles covered honestly, because it’s where I see the most preventable injuries.
Growth plates matter more than enthusiasm. A puppy’s growth plates typically close somewhere between 8 and 18 months depending on breed size (smaller breeds close earlier, giant breeds later). Jumping, weaving, and any obstacle involving impact or twisting should wait until the plates have closed. Before that age, you can absolutely start foundation work: flatwork obedience, tunnels at ground level, targeting, and body awareness games like walking across a wobble cushion. This is also the age where good household habits, like the routines in our crate training guide, pay off, since a puppy with solid impulse control at home settles into structured agility work faster later on.
Breed build affects obstacle choice. Long-backed breeds (Dachshunds, Corgis) are more vulnerable to spinal stress from weave poles and should be trained with wider spacing and slower speed for longer. Brachycephalic breeds (Bulldogs, Pugs) can enjoy low-impact obstacles like tunnels but need close monitoring for breathing distress during any sustained activity, especially in warm weather.
Senior dogs benefit too, with modifications. Lower the jump heights, skip the tire jump and contact equipment, and lean on tunnels and gentle weave work for mental stimulation without joint strain.
When in doubt, get a soundness check. A quick vet exam before starting any jumping program is worth the visit, particularly for dogs with a history of hip dysplasia, luxating patella, or previous soft tissue injury.
A Realistic Training Timeline
Handlers new to the sport often expect their dog to run a full course within a couple of weeks. Here’s what actually tends to happen, based on training logs I’ve kept across dozens of started dogs:
- Weeks 1–2: Tunnel confidence, low jump (ground level to 4 inches), basic “table” stay behavior
- Weeks 3–6: Jump height increases gradually, 2×2 weave pole introduction begins, dog learns to work at a small lateral distance from the handler
- Weeks 6–12: Full 24-inch weave spacing introduced, tire jump added, dog begins linking two obstacles in sequence
- Months 3–6: Full five-obstacle sequences at moderate speed, handler starts working on directional cues (left/right, go-on, come-by)
- Months 6+: Contact equipment introduction (with instructor supervision), full course work, speed and precision refinement
Some fast-learning, high-drive dogs compress this considerably; others, especially older dogs or nervous rescues, take twice as long. Neither is a problem. I’ve trained dogs who needed four months just to walk confidently through a tunnel, and they went on to run full courses just fine once their confidence caught up.
Common Mistakes First-Time Handlers Make
- Raising jump heights too fast. Height should increase in small increments over weeks, not days, and only once the dog is confident and consistent at the current height.
- Skipping the “2×2” weave method. Jumping straight to 12 full-spaced poles is the single biggest reason dogs develop sloppy, unsafe weaving form that’s hard to fix later. Weave poles and pause tables both hinge on impulse control, which is exactly what our piece on obedience vs. instinct digs into if your dog is struggling to hold back.
- Training on the wrong surface. Wet grass, tile, and concrete cause more slips and soft-tissue strains than any piece of equipment.
- Overtraining in one session. Agility uses fast-twitch muscle and repeated impact; five focused minutes beats thirty tired ones every time.
- Ignoring warm-up. A minute or two of loose-lead trotting and gentle stretching before jumping reduces strain injuries significantly, the same way it would for a human athlete.
- Buying contact equipment first. It’s exciting gear, but it’s the highest-risk obstacle category and should come last, not first.
Meet the Trainer Behind This Guide
I’ve spent years working hands-on with working and protection-line dogs through K9 handler programs, and agility foundation work has been part of that training toolkit the entire time, not because every working dog needs to compete, but because the body awareness, impulse control, and handler-focus that agility builds carries directly into obedience, detection, and protection work. Everything in this guide reflects equipment I’ve personally built, bought, worn out, or replaced, and training timelines drawn from real dogs, not marketing copy. If you’re building a broader home training program, our guide on starting search and rescue (SAR) dog training at home shows how the same foundation-first approach applies beyond agility.
If you want a deeper, structured breakdown of foundational obedience and drive-building work that pairs well with agility fundamentals, our training guide is available here: The Complete K9 Handler’s Training Companion.
FAQs
1. What is the cheapest way to start dog agility at home?
Build your own PVC jumps and weave poles for under $50 total, and buy just a commercial tunnel and tire jump for safety. A full hybrid starter setup typically lands between $150 and $200.
2. What age can a puppy start agility training?
Puppies can start foundation work, tunnels at ground level, targeting, obedience, from around 8 weeks old. Jumping and weave pole work should wait until growth plates close, generally between 8 and 18 months depending on breed size.
3. How much space do I need for a home agility course?
A 30 x 40-foot yard fits a basic five-obstacle course comfortably, though many handlers successfully train one or two obstacles at a time in spaces as small as a two-car garage.
4. Is dog agility safe for all breeds?
Most breeds can participate safely with the right modifications. Long-backed breeds need wider weave spacing and slower pacing, brachycephalic breeds need close monitoring in heat, and any breed with joint or spine concerns should get a vet check before starting.
5. What’s the correct weave pole spacing for training at home?
Use 24 inches center-to-center, which matches current AKC and most international regulation standards. Older 20-inch spacing has largely been phased out because wider spacing reduces spinal strain on the dog.
Conclusion and Next Steps
You don’t need a competition-grade rig or a professional trainer’s budget to start agility at home. Five pieces of equipment, a jump, a tunnel, weave poles, a pause table, and a tire jump, cover almost everything a dog needs to learn before contact obstacles ever enter the picture, and you can build most of that starter set for well under $200.
The real work isn’t the shopping list, though. It’s the patience: raising jump heights slowly, teaching weaves with the 2×2 method instead of rushing to full spacing, training on safe non-slip surfaces, and respecting your dog’s growth plates and breed-specific needs. Handlers who skip those steps are the ones I see dealing with setbacks and injuries months later.
Start with the core five. Keep sessions short. Track your dog’s progress instead of comparing it to some stranger’s video online. Do that, and you’ll have a genuinely capable little agility dog well before you ever need to think about an A-frame.

Her work centers on applied training across obedience, detection, protection, and operational readiness, with a strong focus on Military Working Dogs (MWDs) and security K9 programs. Rather than relying on theory alone, Rofiat emphasizes proven training methods built on repetition, consistency, and real-world conditioning principles that prepare both dogs and handlers for high-pressure tasks.
Through articles, training content, and documentaries, she shares experience-based insights from the field, highlighting how structured training, clear communication, and trust between handler and dog directly impact performance and reliability.
Drawing from years of frontline experience, she is also the author of “Beyond the Bark: Inside a Pro Handler’s Playbook for Raising the Ideal Dog,” a practical guide designed to help dog owners and handlers apply professional training principles in everyday situations.
She remains committed to responsible K9 development, continuous skill refinement, and practical education for handlers, trainers, and dog professionals.
- Essential Dog Agility Equipment for Home Training - September 13, 2026
- Saint Bernard Breed Dog: 5 Easy Obedience Training Tips - September 12, 2026
- How to Stop Puppy Biting Fast: 5 Proven Steps - September 12, 2026