Bite Sleeve Training: How to Build a Perfect Grip
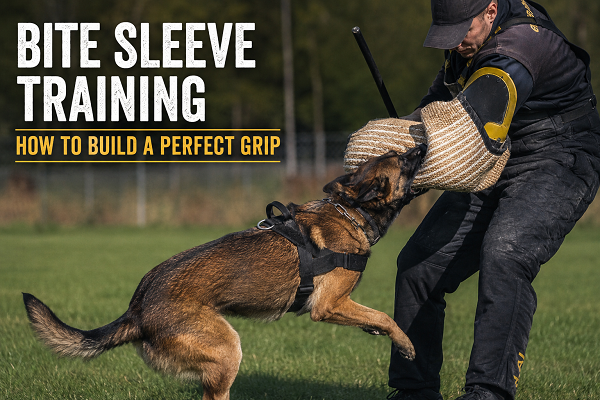
Bite sleeve training builds a full, firm, calm grip. The dog bites deep into the sleeve with its back teeth, holds steady without chewing or regripping, and releases on command. You build it in stages. Start with prey drive and tug games, move to soft sleeves, add pressure slowly, then challenge the grip with resistance and countering. Expect 12 to 18 months from first tug to a reliable, trial-ready grip.
Table of Contents
- What Bite Sleeve Training Really Teaches
- What a “Perfect” Grip Looks Like
- Before You Start: Dog Readiness Checklist
- Sleeve Types and When to Use Each
- The Grip-Building Timeline
- Step-by-Step: Teaching the Full Grip
- Countering: The Secret Behind Deep Grips
- Calm vs. Firm: The Debate Handlers Argue About
- Common Grip Faults and Fixes
- From Sleeve to Suit: Making the Transition
- What Gear Costs
- Safety Rules
- Why You Can Trust This Guide
- FAQs
- Conclusion
Introduction
You’ve got a dog with drive. It loves to chase, it loves to tug, and the first time you put a sleeve in front of it, it bites. Great start. Then you notice the bite is shallow. The dog nips with its front teeth, chews, and keeps shifting its grip. A decoy can shake that dog loose in seconds.
Sound familiar? You’re not alone. Grip problems are among the most common issues in sport and working dog programs.
In this guide, you’ll learn what a perfect bite sleeve grip actually is, how to build it step by step, and how to fix the faults that hold dogs back. You’ll also get an honest age-by-age timeline, gear costs, and the safety rules that keep dog, decoy, and handler in one piece.
What Bite Sleeve Training Really Teaches
Here’s the thing most new handlers miss. Bite sleeve training isn’t about teaching a dog to bite. Dogs already know how. You’re teaching three things:
- Where the dog bites (target)
- How it bites (depth and strength)
- How it behaves while holding (calm control and a clean release)
That’s the grip. In IGP (formerly Schutzhund), Mondioring, French Ring, PSA, and police patrol work, the grip is the most closely watched moment of the routine.
Why? A shallow grip fails in real life. The San Diego decoy training course notes that a short, front-teeth grip usually comes from poor decoy work or a dog lacking the confidence to take and hold a full grip. A short grip is usually caused by lack of proper decoy training, or by a dog that lacks confidence to obtain and hold a full grip. So the fix is rarely “bite harder.” It’s usually “feel safer and be challenged correctly.”
What a “Perfect” Grip Looks Like
A perfect grip has three parts, and judges and police trainers want all three:
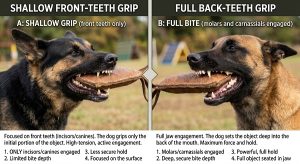
- Full: The dog takes the sleeve deep, past the front teeth, with its back teeth (molars) engaged and its mouth wrapped around the bite bar.
- Firm: The dog bites with real pressure and keeps it, even when the decoy resists.
- Calm: The dog holds steady without chewing, regripping, or vibrating with tension.
In IGP, the protection phase is worth 100 of 300 points, and a dog needs at least 70 points in each phase to pass. Judges mark down shallow grips, regrips, and weak holds. So a messy grip costs real points, even if the dog never lets go.
Before You Start: Dog Readiness Checklist
Don’t rush to the sleeve. Check these first:
- Age and teeth. Keep puppies on soft tugs and bite pillows. Wait until adult teeth are in before real sleeve work. Your vet can confirm.
- A vet check. Mouth, jaw, neck, and hips should be healthy. A dog in pain will grip badly, and it’s not a training problem.
- A solid out. If the dog can’t release on command in calm settings, don’t add bite work yet.
- Drive. The dog should chase and tug with enthusiasm.
- Nerve and confidence. A nervy dog needs slow, confidence-first work with an experienced helper.
I’d also add a fifth rule from experience: never start bite work when you’re short on time. Rushed sessions create sloppy bites.
Sleeve Types and When to Use Each
There’s no single “bite sleeve.” Each type does a different job.
| Stage | Sleeve / Tool | Purpose |
|---|---|---|
| Puppy (8 to 12 weeks+) | Bite pillow, soft tug | Build the love of gripping and tugging |
| Young dog | Soft puppy sleeve (e.g., French linen) | Learn bite angle and a strong grip safely |
| Developing dog | Jute or intermediate sleeve | Steady pressure and bite feedback |
| Grip training | Compression bite-bar sleeve | Encourages a deeper, fuller bite |
| Advanced | Hidden sleeve, suit, trial sleeve | Target a body and handle real resistance |
Some real examples. Soft French-linen puppy sleeves are made so young dogs can learn bite technique, correct angle, and a strong grip. Compression bite-bar sleeves are different. Ray Allen’s wedge design, for example, forces the dog to open its mouth and take a full grip on the bite bar all the way to the back.
Rotating sleeves also matters. A patent on training sleeve sets notes that after several sessions with different sleeve types, a dog learns to visually tell them apart. So don’t rely on one sleeve. Mix them so the dog grips by habit, not by recognizing a favorite sleeve.
Don’t forget the cover. Most training sleeves need a replaceable outer cover that’s meant to wear out. Budget for a few.
🔗 Want a deeper sleeve comparison? Read our guide to choosing the right bite sleeve strength level.
The Grip-Building Timeline
Anyone promising a “perfect grip in 8 weeks” is guessing. Here’s a realistic outline. Every dog is different, so treat the ages as a guide, not a deadline.
| Age / Stage | Focus | Equipment |
|---|---|---|
| 8 to 16 weeks | Prey drive, tugging, out basics | Tug, bite pillow |
| 4 to 8 months | Full-mouth habit, confidence, chasing | Soft puppy sleeve |
| 8 to 12 months | Grip under light pressure, targeting | Intermediate / jute sleeve |
| 12 to 18 months | Full grip under real resistance, calm holds, countering | Jute, compression sleeve |
| 18 to 24 months | Trial or patrol prep, escapes, call-outs | Trial and hidden sleeves, suit |
| 24+ months | Maintenance and titling | Rotation of all gear |
IGP clubs usually require the BH companion-dog test before a dog can compete, and IGP1 has a minimum age requirement. That reflects how long it takes a dog’s nerves, body, and grip to mature.
Dogs rushed through this timeline almost always show it later. The grip falls apart the first time a decoy adds real fight.
🔗 Curious how structured programs sequence early development? See how to start a military K9 training program.
Step-by-Step: Teaching the Full Grip
Here’s the sequence I follow. Adjust the speed to your dog. Some need weeks per step, others months. Always work with a trained helper once you pass the puppy stage.
Step 1: Build drive first. Use flirt poles, tugs, and chase games. A dog with weak prey drive won’t produce a confident grip, no matter how good your technique is.
Step 2: Present the sleeve low and moving. Movement triggers drive. Drag the sleeve along the ground and let the dog catch it before lifting it.
Step 3: Raise the sleeve to build a fuller bite. The San Diego decoy course describes waving the sleeve at shoulder height, then bringing the sleeve to the chest as the dog leaps, which pushes the dog into a harder, fuller bite. Dogs trained to bite high also don’t nip at clothing.
Step 4: Make holding the only safe choice. Leerburg’s guidance is useful here. First the dog learns it must hold the bite, because releasing leads to more pressure from the helper. Once the dog understands it must hold, you can work on grip depth. Don’t skip this order. Depth comes second.
Step 5: Slacken, then tension. The helper relaxes the sleeve and lets the dog re-grip. The instant the dog bites deeper, the helper adds tension. The dog learns that deeper equals control.
Step 6: Reward depth, not speed. Don’t pull the sleeve away on a shallow nip. Reward a deep bite with movement, a fight, or a slipped sleeve. Never reward a front-teeth bite with a prize.
Step 7: Add calm. Once the grip is deep, ask for a short pause or hold. Then let the dog fight again. That’s how you build “calm” into the bite, not just power.
Step 8: Train the out separately. Practice outs in calm, low-drive settings, away from big bites. The out must work before pressure rises.
Step 9: Rotate sleeves, then add targeting and movement. Only add long bites, escapes, and call-outs after the dog produces a full grip from a stationary or short presentation.
Countering: The Secret Behind Deep Grips
Most competitors skip this, and it’s one of the most useful tools for grip.
Countering means the dog re-adjusts to a deeper bite when it meets resistance, often pushing forward and into the helper. Experienced trainers describe it this way: when the dog takes a shallow bite, you give slack on the line until the dog adjusts deeper, then add tension again. Once the dog counters and takes a deeper grip, it’s expected to pull with its body against the helper’s opposing force.
Handlers argue about whether a dog should pull back or push forward. One trainer prefers a dog that drives forward, noting that forwardness suggests confidence, while pulling can sometimes hint at uncertainty. In sport, judges often like to see backward pull because it shows the grip clearly. Either way, the full grip matters most.
Another trainer view: don’t reward weak bites. Rewarding shallow, frontal bites teaches a dog to bite shallow and weak. So when your helper “slips” the sleeve, it should happen on a full, committed bite, not a lazy one.
Important: Countering needs a trained helper, proper equipment, and often a back-tied or lined dog. Don’t try this at home.
Calm vs. Firm: The Debate Handlers Argue About
Is a calm grip or a firm grip more important? Handlers split on this.
On the Controlled Aggression podcast, protection sport trainer Jerry Bradshaw argued that a firm grip matters more than a calm grip, and the dog should default to a full grip all the way to the back teeth. He also noted that a lot of busy grips come from failing to challenge the grip and give the dog something it can bite successfully.
My take, after years around working dogs: both matter, but in a certain order.
- Fullness first. A shallow grip is the root of many problems.
- Firmness next. Pressure and resistance build strength.
- Calm last (but never ignored). Calm shows the dog is under control and not conflicted.
For police dogs, the order shifts a little. Calm control and a reliable out matter just as much as a hard bite, because the dog must release safely around people.
Common Grip Faults and Fixes
| Fault | Likely Cause | Fix |
|---|---|---|
| Shallow / front-teeth grip | Sleeve presented too fast or too soft; dog lacks confidence; pulling away on bite | Slow presentations; use a compression-bar sleeve; reward only deeper bites |
| Regripping / chewing | Unsure grip; “busy” bite from lack of challenge | Give a sleeve with a firm bar; hold steady tension; build confidence |
| Dropping under pressure | Pressure added too fast | Step back to a lower pressure level and rebuild |
| Mouthy, shifting grip | Weak targeting; decoy moving too loosely | Control the dog (line/back tie); teach the bite zone |
| Poor out | Out only taught at the end of fights | Practice outs in calm settings and low drive |
| Fear / avoidance under pressure | Nerve issue, not technique | Stop. Work with an experienced helper on confidence-first prey work |
A quick rule: if a grip problem shows up under pressure, go back one step, not forward. Pushing harder rarely fixes it.
From Sleeve to Suit: Making the Transition
A dog that grips well on a sleeve can still struggle on a bite suit. The suit is bigger, has more places to bite, and feels different. That matters most for police and personal protection dogs.
Tips to make the move smoother:
- Use gear that mimics the suit. Some arm sleeves are designed to mimic the bite feel of a bite suit, helping dogs move between sleeve and suit training.
- Teach targeting early. San Diego’s decoy course warns that poorly trained decoys let dogs bite anywhere, including places that wouldn’t work on a real person. Teach the dog where to bite: high inside and outside arms, legs, and forearms.
- Keep the grip standard the same. Trainers report that when foundation work is solid, a dog’s grips stay the same when the suit first appears. Weak foundations show up fast.
If your dog heads toward patrol or security work, also see our guide on K9 security dog handler training.
What Gear Costs
Prices vary by brand and country, so treat these as rough guides and check current listings.
- Bite pillow or tug: low cost, often under $40
- Soft puppy / French linen sleeve: about $100 or so. One Dingo Gear French-material sleeve lists at around $104.
- Advanced arm sleeve for experienced decoys: Ray Allen’s bite suit arm sleeve lists at $154.99.
- Replacement sleeve covers: a recurring cost
- Full bite suit: usually the biggest expense, often shared by clubs
Most handlers end up with two or three sleeves over a dog’s development. Cheap gear that tears or shifts can give the dog a bad experience and set you back months.
Safety Rules (Non-Negotiable)
Bite work carries real risk. Follow these rules:
- Use a qualified helper or club once you leave the puppy stage.
- Inspect gear before every session. Look for torn stitching, loose bars, or worn covers.
- Match pressure to the dog, not the calendar.
- Train the out first, and keep it reliable.
- Stop if the dog is stressed, injured, or off. Training on a bad day builds bad habits.
- Know your local laws. Rules for protection training differ by country and state.
Why You Can Trust This Guide
This guide comes from the ARFS K9 Team, led by Cpl. Rofiat Muritala, a Nigerian Army military working dog instructor and handler with more than 14 years of experience at the Nigerian Army Dog Centre. Her work covers dog selection, foundational training, behavior shaping, and performance evaluation in real operational settings.
The advice here also draws on published material from police decoy training programs, equipment makers, and respected protection sport trainers, named in the text above. Where trainers disagree, such as pull-back vs. push-forward grips or firm vs. calm priorities, we say so instead of pretending there’s one answer.
FAQs
1. How do I start bite sleeve training with a puppy?
Don’t start with the sleeve. Build tug and chase drive with soft tugs and a bite pillow. Keep it fun with no pressure. Move to a soft puppy sleeve only once the dog is eager and its adult teeth are in, and always use a trained helper.
2. What’s the best bite sleeve for building a full grip?
For beginners, a soft French linen or jute sleeve works well. For grip depth, a compression bite-bar sleeve helps because its shape pushes the dog to open wide and bite deeper. Choose by your dog’s current skill, not its future goal.
3. How long does it take to build a perfect grip?
Plan on 12 to 18 months from first tug to a dependable trial-level grip. Faster is possible only with an exceptional dog and an experienced helper, and rushing often backfires.
4. How do I fix a shallow or front-teeth grip?
Slow down your presentations, use a sleeve that rewards depth, and stop rewarding shallow bites. Give the dog slack to re-grip, then add tension when it bites deeper. If the dog seems nervous, rebuild confidence at lower pressure first.
5. Can I do bite sleeve training without a professional helper?
Early drive-building with tugs and a bite pillow works fine at home. Once you add a sleeve, resistance, or real fights, you need an experienced helper. Poor decoy work is one of the biggest causes of bad grips.
Conclusion
A perfect bite sleeve grip isn’t a trick you teach in a weekend. It’s the result of months of patient, well-ordered work. Here’s what to remember:
- Build drive first, pressure second.
- Teach the dog that holding is the only safe choice, then work on depth.
- Challenge the grip with resistance and countering, guided by a good helper.
- Match your sleeve to your dog’s current stage, and rotate sleeves.
- Train the out separately and keep it sharp.
- If a fault appears, go back one step instead of pushing on.
Ready for your next step? Start this week by checking your dog’s out command and drive, and book time with a qualified helper or club.
📘 Want a foundation that makes all of this easier? Our e-book, Beyond the Bark: Inside a Pro Handler’s Playbook for Raising the Ideal Dog, covers the obedience and control basics every working dog needs before bite work.
📬 Get more handler-level training tips every week. Subscribe to our weekly articles roundup newsletter.

Her work centres on obedience, detection, protection and operational readiness. She favours proven methods built on repetition, consistency and real-world conditioning, so that both dogs and handlers are prepared for high-pressure tasks.
Rofiat represented the Nigerian Army Dog Centre at the Nigerian Army Day Celebration (NADCEL) 2026, where she led demonstrations in obedience, explosive detection, agility and tactical movement. Through articles, training content and documentaries, she shares field-based insight into how structured training, clear communication and trust between handler and dog affect performance and reliability.
She is the author of Beyond the Bark: Inside a Pro Handler's Playbook for Raising the Ideal Dog, a practical guide that helps dog owners and handlers apply professional training principles in everyday situations.
- How to Enter the COBA National Dog Championship - October 20, 2026
- K9 Advantix Dosage Chart & Safety Guide for Dogs - October 19, 2026
- How to Set Up & Use Bousnic Dog Training Collar - October 18, 2026